Thursday, August 31, 2006

Simple Holidays


These new holiday papers make it really easy to make quick and classy cards. I made this 4.25 square card to go in a gift tin/door prize. I made a vellum tag, using the 1-1/4 and the 1-3/8 circle punches. Then I attached that tag to a thin strip of cardstock to give it a ribbon appearance. This card also uses the new oval punches to imitate the hodgepodge hardware look.

Tuesday, August 22, 2006

Family Pocket Book

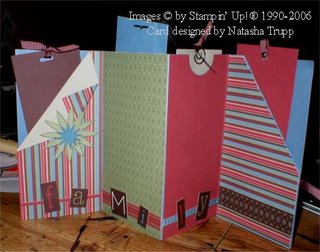
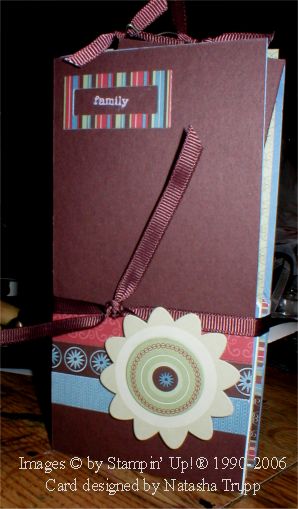
I love these little pocket books. They are ridiculously easy to make, they make fabulous gifts, and they are sturdy enough to double as a standing frame. These were featured in the June Stampin' Success, using the Petal Patch papers. My up-upline made a beautiful book using the new holiday papers (Holiday Thyme) and that inspired me to try one too. I used the Simply Scrappin' kit "At Home" to decorate. The only other supplies I used were some hodgepodge hardware, a few punches, and some chocolate ribbon.


Here's the inside. The base is a piece of Buckaroo Blue cardstock, folded in half, scored every 3 inches across to make 4 panels. This type of project works well for showcasing just how far one of the Simply Scrappin' kits can go. The project looks were impressive, but it really doesn't use that much paper. I love it!

Sunday, August 13, 2006

Dreamy Chipboard


I so love using the new On Board chipboard, especially with the designer papers. Here, I've used the Sarah papers and the letters for "dream". The d is the only piece that is actually covered, and I've highlighted it here in this photograph. I also used one of the little flowers from the accents. I sponged classic Celery on it, then cut out one of the circles from the Sarah papers for the center. I was pleasantly surprised by how well the chipboard took the classic ink. The trick is sponge it so much that it looks like too much. Let it sit, as it dries, the colour absorbs into the chipboard. If you excessively sponged it in the first place, then plenty of the colour remains at the surface once dried.

The other letters were made by tracing the chipboard. I sponged around them to give a bit more definition (see inset)

Monday, August 07, 2006

Thoughtful Lion


I just love this lion from the Wild About You set. I coloured in the eyes and nose after stamping it to make the face 'pop' a bit more. I love making this 4.25 rounded square cards. They are just so ideal for a little note. I made a set of 4 of these, using Bazzill Textured papers, and the elephant, giraffe, and alligator images from Wild About You. The sentiment comes from the hostess set, Warmest Regards.

Sunday, August 06, 2006

Mini Card Tin


I've had this little tin lying around for weeks, so I finally decided to make it into a little gift. With all the holiday pre-ordering, it's easy to forget about the things that were exciting a mere few months ago. I've been hoarding the Summer Mini papers, Petal Patch. What better time to use them then now. The little frame on the lid is some covered On Board chipboard. I love that stuff! The only stamp on this project is the tiny 'hello' from Amazing to Zany.

Eat Cake! Wedding Cake, that is...


So I haven't even touched the "Eat Cake" stamp set since I got it at convention. I remember seeing a lovely sample that used the cake for a wedding card, so I thought, why not use the present for a wedding card. I used black, silver, and white for my colour scheme to keep it simple, yet classy. I also made the card a longer style, ideal for a check (it measures 6x3.5) .

Blue Spots


I made a pink congratulations baby card last week, but I realized that this layout and this combination of stamp sets can really be applied in any colour and for almost any occasion! So here's a blue thank you version that's going out in the mail on Tuesday!